Showing posts with label tips. Show all posts

Friday, December 11, 2015

GF Marie Callendar's Style Cornbread - Take 1

Melanie informed me that Gluten-Free Mike had been lamenting the loss of Marie Callender cornbread in his life.  I understand. It is indeed a lamentable loss.

And, unlike Spouse 1.0, Gluten-Free Mike can't like the dense, corny cornbread made in cast iron skillets.  No, to Gluten-Free Mike, "cornbread" has only one definition: Marie Callender.

So, what could I say, other than, "Challenge accepted!!"

My first thought was to try incorporating corn and honey into my garbanzo bread. I rejected that idea before even getting home to my mixing bowl.  Instead, I reached for my iPad and started googling. Surely someone had done a GF copycat recipe.  They had. I tried it, and it was good in the way that an over-sweetened box of Jiffy cornbread would be good.

As in, not good enough.

I thought back to the first time I had Marie's bread. I splurted, "This isn't cornbread! It's cake!"

It took me many Sunday lunches of steamed vegetables to accept the idea that having a square of dessert with your steamed vegetables wasn't a bad thing.  And, many more Sunday lunches to come to love the stuff.

So, back to Gluten-Free Mike and the quest for cornbread.

If Marie's is more cake than bread, then I need to understand the ratio differences between quickbread and cake. Fortunately, Spouse 1.0 got me the Ratio book last year for Christmas.

I decided to try something half way between a quickbread and a cake. And, it worked!

Unlike a lot of my recipes, this one is all about specific ingredients and correct technique.  You'll dirty more things when you make this.  But, it is so very worth it.

I haven't heard yet whether the bread passes the Gluten-Free Mike test. But, since everyone else likes it, here it is: The bread and its back story.
Since this is half way between a bread and a cake, use a cake making method.  First, you cream the butter and sugar in your stand mixer until it is very, very creamy.  Scrape the bowl a time or two while it is mixing.
Cream butter and sugar
While the fat and sugar are creaming, prepare the dry ingredients.  Grind the cornmeal in a clean coffee grinder or a high power blender until the cornmeal is warm.  If using the coffee grinder, do it in two stages. Add all dry ingredients to a small mixing bowl and whisk well to combine.

Mix dry ingredients
Mix dry ingredients together

Once the fat and sugar is well creamed, add the eggs and mix until they are well incorporated. Don't over mix. You don't want the eggs to get tough. Scrape the bowl.
 

Add eggs
Add eggs

Add the dry ingredients to the butter and sugar mixture in 2 or three stages, mixing only well enough to incorporate and scraping the bowl a couple of times.


Add dry ingredients
Add dry ingredients
Add the clabbered milk and mix just until incorporated. Gently scrape the bowl once while mixing. The batter will be fluffy and beautiful. 


Add clabbered milk
Add clabbered milk
 
Gently pour the fluffy, beautiful batter into a well-greased 8" pan.  Wet your fingers and gently smooth the batter so that it is evenly distributed. 

gently spread batter in 8 inch pan

Bake and enjoy.  Of course, you'll want to mix up some honey butter to go with this. 


Pamela's Marie-Style Cornbread

Ingredients:

1-2 tsp organic apple cider vinegar
4 ounces goat milk
2 ounces butter, softened but not melted
2 ounces Spectrum organic shortening
4 ounces (1/2 cup) organic sugar
2 large eggs
3 ounces Arrowhead Mills Organic Gluten Free Cornmeal*
3 ounces Authentic Foods Classic Gluten Free Blend**
1 Tbsp baking powder
1 tsp baking soda
1 tsp salt
3/4 tsp xanthan gum

Directions:
  1. Thoroughly grease an 8" square baking pan and preheat oven to 350 (f).
  2. Pour 1-2 tsp apple cider vinegar into cup.
  3. Add goat milk to weigh 4 ounces. Set aside to clabber.
  4. Weigh butter, shortening, and sugar into the mixing bowl and set it to creaming. Scrape bowl periodically.***
  5. Grind cornmeal in a clean coffee grinder or a high powered blender.
  6. Add dry ingredients to a small mixing bowl and whisk to incorporate.
  7. Add eggs to butter-sugar mixture. Mix just enough to thoroughly incorporate. Scrape bowl once while mixing.
  8. Add dry ingredients to the butter-sugar mixture in at least two stages.  Mix just enough to incorporate. Scrape 2-3 times while mixing.
  9. Add clabbered milk, mixing just enough to incorporate.  Scrape bowl once while mixing.
  10. Pour mixture into the prepared baking pan.  Wet fingers and smooth batter evenly in the pan.
  11. Bake 350 for about 25-30 minutes, until toothpick tests done.
Notes

* I love Bob's Red Mill products, and I love the course grind of their cornmeal for other things.  For this bread, you really do need the finer grind of Arrowhead Mills.

** Authentic Foods grinds their brown rice flour more finely than other brands I've used.  This is important for the fluffiness factor. 

*** Be sure to turn your mixer off and unplug it while scraping the bowl. 

Sunday, November 15, 2015

Thai Basil Pesto

What do you do when you want to make pesto, but only your Thai basil is doing well, while your other basils are barely hanging on for dear life?

Well, you could make normal pesto using Thai basil, but that would be just too weird.  Thai basil is its own thing.  It really isn't a substitute for other basils.

So, embrace the Thai-ness of it.  Make Thai basil pesto.  I know that sounds weird, but it's weird in a good way. Whereas normal pesto using Thai basil would be weird in a bad way.

So, what might that look like?  Going ingredient by ingredient....

Garlic: Keep.  Thai food and garlic are friends.

Pine nuts: Nope. No way. Sesame seeds would be good, but using only sesame seeds would be kind of... seedy.   Almonds would be tasty, but they're too hard. Cashews have a good texture. Sesame seeds and cashews. Definitely!

Olive oil: Absolutely not! Toasted sesame oil is lovely, but a bit strong.  Using part untoasted sesame oil would be lovely, but I don't have any. So, maybe walnut oil along with the toasted sesame.

Pecorino romano: Cheese? Yuck! Not for Thai pesto. Just leave it out. Or increase the nuts.

Salt:  Yes. And black pepper.

So, more or less using my favorite pesto recipe, I just madke the substitutions above.  Except, I've been making pesto so long, I don't use a recipe and have no idea how much of each ingredient I use. I just do everything to taste. Here are some rough guidelines:

Ingredients (quantities are very approximate):

1-2 Tbsp toasted sesame oil
2-3 Tbsp walnut oil
2 cloves crushed garlic, or 2 garlic ice cubes, plus a dash of dry roasted garlic
1 fist full of cashews
2-3 Tbsp sesame seeds
2 cups loosely packed Thai basil leaves
Sea salt & freshly ground black pepper to taste

Directions:

  1. Pulse everything except basil, salt, & pepper until minced. 
  2. Pulse in basil leaves, being careful not to over process. 
  3. Add salt & pepper to taste.
  4. Store in refrigerator.

Serving suggestions:
  • Toss some with poached chicken and cooked rice noodles.
  • Plop some on cooked vegies to give them a little excitement.

Wednesday, June 17, 2015

Gingerbread Lemonade

Lately I've been on a lemonade obsession.  I don't particularly care for the stuff, but Spouse 1.0 drinks it like it's going out of style.

And, given The Curse of David*, lemonade may well be doing just that.

So, to mitigate The Curse of David, save money, and reduce our carbon footprint, I've been making lemonade. Lots & lots & lots of it.

I used to think that making homemade lemonade required juicing zillions of lemons.  Then I discovered bottled lemon juice.  Maybe not quite so exciting as fresh squeezed, but there's still a lot of money and bottles saved when you buy just one quart of lemon juice to make 8 quarts of lemonade.  Plus you get to control the sugar content.

Of course, it's completely impossible for me to make the same thing over & over again. There's just something in how my brain is wired that connects the brain cell that stores the information, "Spouse 1.0 loves lemonade" with the brain cell that stores "Spouse 1.0 loves ginger", which in turn connects to the brain cell that stores "Spouse 1.0 loves gingerbread lattes".

So, we get Gingerbread Lemonade:

Ingredients
- 1 tsp freshly grated ginger, or 1 ginger ice cube
- 1/8 tsp powdered ginger
- 5/8 tsp Apple Pie spice
- 35 drops liquid vanilla stevia
- 1/2 ounce agave syrup
- 1 ounce molasses
- 4 ounces fresh or bottled organic lemon juice
Filtered water

Directions:
  1. Using a sturdy kitchen scale**, place all ingredients into a 1 quart bottle or jar.
  2. Add a small amount of warm or room temperature filtered water.  Tightly cap the jar and shake until all ingredients are well-combined.
  3. Continue filling jar with room-temperature water.  Taste and adjust seasonings and sweetness, then place in the refrigerator to chill.
    Don't over-spice it.  As the lemonade chills, the spices will continue to infuse.

* The Curse of David: A law of the Universe by which anything that Spouse 1.0 likes will be discontinued almost as soon as he discovers that he likes it.  The law further decrees that the more he likes it, the sooner it will be discontinued.  Most blatant example: VW Cabrio. 

** I strongly recommend using a kitchen scale, especially when you are dealing with sticky-ickies such as molasses, honey, or agave. Using a measuring cup wastes water and unnecessarily increases your work load.

Wednesday, March 25, 2015

Pizza Pain Perdu (GF)

It happens way more often than we want to admit. We go to some GF restaurant, pay an extra $4 for our pizza to be on a gluten free crust, and when served, we realize that we have just been served cardboard with a smattering of cheese and meat.

Not wanting to be wasteful, we bring that miserable excuse for pizza home, and try to feed it to our dog.  He snubs it.  We try to compost it, but even the worms won't touch it.

Never fear, you can stop using that leftover pizza for a doorstop and turn it into an easy, yummy breakfast. It's easy.  (Not fast, but definitely easy.)

Pizza Pain Perdu

Ingredients

For each serving, you will need:

2 small slices of leftover GF pizza
1 egg
Scant 1/2 cup goat milk or unsweetened milk alternative
dash of salt or smoked salt
dash of pepper
pinch or two of Italian herb blend (Penzey's Frozen Pizza seasoning is perfect)

Directions


  1. Lightly oil or spray a 3-cup rectangular Pyrex dish.
  2. Place pizza slices in dish, alternating directions.
  3. Mix remaining ingredients in a small bowl. Pour over the pizza and let set for about 15 to 30 minutes.
  4. Bake at 350 for about 25 to 30 minutes, until all is baked through.
Alternating pizzza slices in a Pyrex dish

Savory custard mixture: Egg, goat milk, seasonings


Pizza soaking in the custard mixture
 

The finished product


Close-up of the finished product: No more cardboard

Easy Low Sugar Cranberry Lemonade

I don't drink things with calories. Calories are for chewing, not sipping. I mean, seriously. For 150 calories, would you rather have one 12-ounce can of soda OR a small cookie, a small piece of chocolate, a small salad, plus a big glass of water with a lemon or lime slice?

And, don't even get me started on the $5 frou-frou drinks.

Spouse 1.0 does not share this philosophy. And, because I really don't want him to be dead, I'm always on the lookout for low-sugar alternatives.  Preferably ones not loaded with chemical sweeteners.

To that end, liquid vanilla stevia has become my best friend. Powdered stevia is nasty. Liquid stevia is less nasty. Liquid vanilla stevia is almost bearable. Liquid vanilla stevia mixed with a caloric sweetener such as agave, honey, or organic cane sugar is actually quite pleasant.

This lemonade is easy to make, just sweet enough, and has less than 40 calories per cup.  Depending on how you shop, it's probably under $1.00 per bottle -- less than 1/4 the cost of commercial drinks.

Easy Cranberry Lemonade

1.5 ounces bottled pure lemon juice
1.5 ounces bottled pure, unsweetened cranberry juice
1 ounce honey, agave syrup, or ginger syrup (Spouse 1.0 prefers the latter.)
About 35 drops liquid vanilla stevia (Whole Foods brand is best.)
Filtered water

Add all ingredients to a 32 ounce container.  Add a little warm filtered water and mix well.   Add cool filtered water until the container is almost full. Mix, taste, and adjust.  If you want things a little sweeter, add a couple of drops of the stevia and a drizzle of syrup.  If you want things a little more puckersome, add some more lemon and/or cranberry juice.  Chill and enjoy.


Tuesday, June 3, 2014

Pesto and Goat Cheese Muffins

I don't usually buy mixes.   But, when a local discount store had Hodgson Mill GF pancake mix with flaxseed for an astoundingly good price... well... there are some bargains one just can't resist.

So, I took the mix on a recent trip and made Spouse 1.0 some pancakes in the hotel's kitchenette. They were good. He liked them.

Fast forward a month, and it's a busy weekday morning. I'm out of paleo bread and don't have much time. I open the cupboard, and there's the mix. Yeah.  I'll make him pancakes. But, pancakes require more babysitting than muffins. Well, why not use pancake mix to make muffins?  After all, that's what Bisquick was: Pancake mix that could be used for anything.

Hmmm. What to put in them?  I open the fridge, and there's some pesto that needs to be used up.  And,  there's some of that lovely roasted red pepper goat cheese that's getting really close to its use by date.

Yeah. Pesto and Goat Cheese Muffins.

Ingredients

160 grams GF pancake mix with flaxseed. (Or any other GF cake mix)
2 medium eggs (about 1.9 ounces each)
8 ounces goat milk
1-2 tsp sugar (to taste)
1 ounce avocado oil or olive oil
A big spoonful of extra thick pesto (maybe ~2 Tbsp?)
Leftover goat cheese crumbles (maybe about 1.5 ounces?)

Directions
  1. Preheat oven to 350 (f)
  2. Prepare 9 muffin cups by lining with baking papers then spraying with olive oil.
  3. Mix all ingredients together.   
  4. Fill the prepared muffin cups to about 2/3 full. 
  5. If desired, sprinkle the tops of a few of the muffins with a little extra pesto.
  6. Bake until they smell good and a toothpick tests done. Probably about 12-20 minutes.
They weren't really this golden.  I'm not sure what my camera was thinking.


Tips
  • Due to variations in egg weight or moisture content of the pesto or cheese, you may have to adjust the batter. Add a drizzle of goat milk if it looks too thick or a bit more mix if it seems too thin.
  • Use a 6 cup muffin tin and 3 custard cups.  If you have too much batter, grab another custard cup.  The muffins made in the custard cups aren't as pretty as those made in the muffin tins, but they get the job done.
  • I don't bake by time.  No matter how long a recipe says to bake, it's never ever that for me.  It's always a bit less or quite a bit more. So, mostly, I bake by smell and by toothpick.  When baked goods smell good, they're probably done or close to it. 
  • To make extra thick pesto: Take about 1.5 to 2 cups of basil leaves and coarsely chop.  Put them in a mini-food processor and add about 1/4 to 1/2 cup pecorino romano cheese, 1/4 to 1/2 cup pine nuts, a few cloves of garlic, and a couple of tablespoons of olive oil. Maybe a little sea salt if desired. Lightly pulse until all ingredients are finely chopped but not emulsified.  Add more oil as need, but keep the mixture thick, like streusel.

Sunday, May 5, 2013

Tip of the Day: Dealing with Bulk Sausage

Spouse loves bagel sandwiches -- like the kind he used to get at our local bagel shop. Even with pre-made GF bagels, making them is a chore.

And, when I say, chore, I don't mean "my favorite chore" or even "a chore that I don't mind doing too much because it's not horrible."

I mean, "Chore." Capital "C" and all.

One reason it's a chore is because bagel sandwiches require sausage patties. And, getting a pre-made GF sausage patty that doesn't contain maltodextrin, autolyzed yeast, "natural flavors", mysterious "spices, and other forms of evil... Well, good luck with that. Let me know when you find someone who makes them.  I'll buy stock in the company.

Meanwhile, the only way I can get sausage patties is to buy the really nice bulk sausage at Sprouts.  Several forms of it contain only food.

But, it's bulk. That means ickifying your hands, patting the stuff out, getting bits of it everywhere, washing your hands 4 zillion times, having to sterilize your kitchen afterwards. And, no matter how good you are of a patter, the sausages never come out an even thickness.  Bleh. It's just not my favorite task.

But, disgust is the mother of necessity, and thus the grandmother of invention. Maybe you've figured this out long ago, but, for me, the method below is something I've recently figured out.  It's not necessarily the most green way of making sausage.  But, it is a real sanity saver.

Equipment:
  • Wax paper
  • A glass with straight sides
  • Food service gloves
  • Table knife
  • Skillet
  • Spatula
  • Cleaning supplies, including Vodka
Ingredients:
  • Sausage
  • Maybe a little oil for the skillet
Steps:

  1. Put on your food service gloves.

    The nice thing about food service gloves: You can wash them much like you would your hands, without removing all your skin in the process.
     
  2. Place bulk sausage between 2 sheets of waxed paper.
     
  3. Roll sausage to about 1/4 to 1/3 inch thickness using the glass.
     
    I don't use a rolling pin because the glass is a lot easier
    to wash, and you don't need the weight and precision you get
    with a rolling pin.
     
  4. Peel back the top layer of waxed paper,
    and cut the sausage into squares.

    Make them a larger than you think you need.

    Sausage is notorious for shrinking.
     
  5. Put a little oil in the skillet and start pre-heating it.
     
  6. Carefully peel the sausage off the bottom layer of
    waxed paper and place sausage in the skillet.
     
  7. Cook sausage until it's done, then use it to make
    a batch of breakfast sandwiches.


Thursday, July 28, 2011

The Spinach Squeezer

I only make goat cheese quiche for people I love.  

That's because squeezing the spinach for it is such a pain.  And, squeezing 4 lbs of spinach to feed 21 people, well, that's more love than my arms can take. 

So, after 21 loved ones had consumed the better part of 5 goat cheese quiches last week, I was bemoaning my dead arms and wondering if such a device as an Automatic Spinach Squeezer existed. 

Spouse 1.0 said, "Why not use a coffee press?"

Yup, you can tell he's been married to me for 23.5 years. Never mind "42."  The answer is "coffee."

I'm rather ashamed that I didn't think of it first.

The next night I was chatting with a chef. He'd never heard of a spinach squeezer. He just uses a salad spinner then finishes with squeezing.

Sorry, not good enough.  I need something that will eliminate the squeezing, not reduce it.

So, out and about, I started examing coffee presses. One had a double layer of mesh. Kind of flimsy. And, whooeee! What a mess to clean that would be! 

Another had a layer of mesh between two metal plates.  The top plate had little holes.  I wondered if one could remove the mesh.

It'd been so long since I had a coffee press, I'd forgotten that they disassemble so you can clean them.

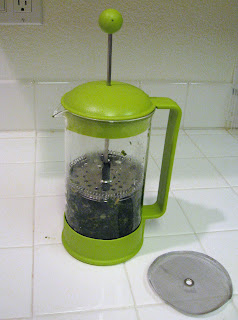
So, finally I picked up an inexpensive spinach squeezer...er, coffee press and began my spinach squeezing experiment. 


Disassemble. Wash.  Reassemble, sans mesh.

Cook up some spinach. 

I started to let it cool, then realized. Duh. The Spinach Squeezer used to be a coffee press. It can handle hot things.

OK. Insert spinach. Insert pressing mechanism, sans mesh. Begin pressing.

It took a lot more pressure than I remember coffee making taking, but it did remove quite a bit of liquid. 

The spinach wasn't as dry as I would have liked it, but I think it's dry enough for quiche.  (I'll know Saturday morning when the next batch of loved ones get some quiche.)

Unlike normal squeezing methods, I was able to capture the juice, which might make a nice addition to my next batch of lentil soup.

So, do I recommend running out to your local merchant and picking up a Bodum Spinach Squeezer?  I'm not sure.  I guess I'll need to use it a few more times before deciding whether I can start making goat cheese quiche for people I merely like.


Friday, April 1, 2011

April Fool's Day Breakfast

When I saw that April Fool's Day was on a Friday this year, my first thought was, "April Fool's Day! Wow, what a cool day for doing a themed breakfast."

So, I immediately snagged it as MINE.

And, my next thought was, "OK, so... now... how exactly do you turn food into an April Fool's Day joke?

Start with Black Bean Brownies. I did a trial run, and sure enough, they were edible.


Then, one day I added some cheese to some millet I was making for The Spouse, and realized I had just invented Cheese Not Really Grits.


The menu was starting to take shape.

I noticed a recipe for eggless scrambled eggs in a library book.... made with tofu, colored egg-ishly with turmeric, and seasoned with enough onion, garlic, and mushroom to hide the tofu-ieness.

And, oddly enough, scrambled tofu wasn't awful. Probably because of all the onion and garlic.


Now, the only thing missing from the menu was fruit. I always bring fruit. It's expected. But, how on earth can fruit be deceptive?

It can't. Fruit is just fruit.

I racked my brains. I may have wracked them, too.

Options:
  • Do normal fruit,  resulting in 25% of the menu not fitting the theme
  • Skip the fruit, violating my self-imposed fruit rule
Nope. Neither option was acceptable.

More racking.

A friend pointed out that tomatoes are fruit. Good point, but everyone knows that tomatoes are fruit. She also reminded me that avocados are fruit. 

Now we're getting somewhere. Tomato & avocado salad. Expensive, lots of work, but maybe.

Then, last week, browsing through another library book, a blinding flash of the obvious: Rhubarb is a Vegetable!!!

Yah... Rhubarb with strawberries. Glorious! 


I'll skip the details of the rhubarb quest. Suffice it to say, when you add the value of the time spent searching, miles traveled, and cost of two 10-oz bags of the frozen vegetable, you've got a dollar amount exceeding the average American's life savings.


And so, the April Fool's Day menu is complete.

Happy April Fool's day!


Saturday, January 8, 2011

Microwaveless Cooking for Six

As I was blissfully rhapsodizing over the joys of the microwaveless lifestyle, and how I can get door to table in under 20 minutes, someone pointed out that they have a family of 6. 

Wow, feeding 6 people without a microwave sounds a lot scarier than feeding 2 people without one. But then, feeding 6 people sounds a lot scarier than feeding 2, no matter how you slice it. 


Make a salad, and you're washing an awful lot of lettuce. Toast? Even if you've got a fancy, new-fangled 4-slice toaster, feeding your family breakfast could easily take until noon.

So, can feeding 6 without a microwave be done?

Treading dangerous territory here, since I've never had kids (outside of a classroom).  I'd be an idiot to say I've got it all figured out and let me tell you how to live your life even though I have absolutely no experience with that life.

There was a reasonably famous fundamentalist/evangelical guru back in the '70's who did that. My husband and I still bear the scars. Luckily, that story has nothing to do with food.

So, back to food and feeding big families without a microwave...

Yup, I'd be an idiot to say I know how to feed larger groups of people without a microwave. I do it when we have company, or when it's my turn for breakfast at work. But, not on a day-to-day basis.

Now, my mom? She knew something about this. She died at the ripe old age of 44.5 without ever having owned a microwave.

Mom came from a family of 7 kids, and as the oldest, she had to do a lot of the cooking. On a wood stove, even.  She never quite outgrew the cooking for 9 (plus drop-in guests) mentality, even when our family had dwindled down to 3 people, one of whom only ate bologna sandwiches.

A big stock pot was the most indispensible item in her kitchen. She was the queen of stovetop casseroles.
 
Some of the things she used to make:
 
Soup beans and cornbread.  When you grow up in the Great Depression way back in the hills of Kentucky, and dad works in the mines and you are feeding nine people, most of whom are over 6 feet tall, you eat a lot of beans and cornbread.  I didn't care much for the way mom made cornbread, but her beans were superb.  Pintos, usually mixed with some type of white bean.  A ham hock (I don't even know what a ham hock is, or where you'd get one.  I just know she used them, and they were gooood.)  I can't remember what-all else. Did she use onions and celery?  I don't know. I do know that you can feed a lot of people for a long time on soup beans and cornbread.
 
Burgoo.  This probably means "hamburger goulash." Only, it wasn't really a Hungarian goulash. It was hamburger, macaroni, and tomatoes cooked with onion, garlic, and other seasonings. Almost certainly celery seed, oregano, bay leaves, paprika.  Think spaghetti, but all in one pot.
 
Spaghetti. Think burgoo, just made with spaghetti instead of macaroni.
 
Hamburger and cabbage casserole. Sort of like unrolled cabbage rolls. Hamburger, tomato, onion, herbs and spices, a little rice, and lots of sliced cabbage.  Yeah, the house might smell a little cabbagey, but it also smelled of all that other good stuff.  Mom's hamburger and cabbage casserole would make a cabbage-eater out of even the snobbiest of cabbage-disdainers.
 
Chili. Oh, my. Mom's chili. Yeah, that was definitely one-pot good eatin'. Sometimes she'd add a little macaroni as it was nearing completion. Slightly overdone pasta added to a rather nice mix of textures.
 
Hamburger soup.  Start with a quart or two of canned tomatoes, add chopped onion, celery, bay leaf, herbs and spices, and all that. After it gets to boiling, crumble the raw hamburger in and add the potatoes and carrots.  Add any other vegetables.  I always liked green beans, corn, zucchini. Cauliflower was OK. Broccoli just didn't belong, in my opinion.
 
Turkey feather soup.  After a holiday meal, mom would boil up the turkey carcass, and instead of straining it to make a clear stock like people do nowadays, she'd just pick the meat off the bones after they'd boiled a while, throw in some additional leftover turkey meat, add potatoes, vegs, and seasonings, and there you have it: Dinner.  One time my ex-step-father once came in when mom was making the soup and grumbled that she'd find a way to cook the feathers from the turkey if she could. So, from then on, we called it turkey feather soup.
 
She also sometimes did split pea soup or corn chowder, plus the usual (and sometimes unusual) assortment of oven casseroles and multi-pot meals. But, the above one-pot wonders were Mom's convenience food staples of choice, and she could feed an army of 6 or 16 with them.

Saturday, October 9, 2010

Modular Cooking

My mom made the best chili.  She used real beans, usually a combination of pinto and kidney. She'd pick through the beans to make sure there were no rocks or other foreign matter. Then she'd rinse them a few times, put them in a huge pot, add water, and get them boiling.

She didn't soak them. Mom was a bean heretic. 

Next, she'd add all kinds of stuff. Chopped onion, bell pepper, canned tomatoes, real garlic, oregano, other seasonings, and hamburger. 

She didn't brown the hamburger first, the way recipes tell you to do. I guess she was a hamburger heretic too.

Like most of Mom's cooking, chili was an all-day affair.  Real food requires real cooking. And real cooking requires real time. Lots of it.

I don't have entire days to devote to cooking.

I have minutes. 30 here, 15 there.  I have to cook in modules.  It goes something like this:

Week one: Brown 2 or 3 lbs of hamburger with onions, garlic, and other seasonings. Place in two containers, label with the date, and freeze them.

Week two:  On Sunday morning, pick through about 1.5 lbs of black beans.  Rinse, drain, add water, and set aside to soak. Shower, dress, go to church.  After church, drain the beans, add water and seasonings, and put them on the stove to cook.  Eat lunch, then do laundry and other Sunday afternoon chores while the beans cook. When they're done, package in several containers of various sizes and freeze.

Week three: Take 1 package of hamburger and a large container of beans out of freezer to thaw. Run a bunch of Saturday-type errands.  About 1/2 hour before dinner, dump the black beans and hamburger in a 3 quart pot. Add 1 can organic tomatoes, 1/2 can organic tomato paste, the last of the pre-chopped Trader Joe onions, some dehydrated garlic, oregano, chili powder, cumin, celery seed, and whatever else strikes your fancy.  Add more garlic.

Voila. Easy, healthy chili. And, it only took three weeks to make it.

Garnish with a few blue corn tortilla chips and call it dinner.


Thursday, September 30, 2010

Modular Food: Pork and Black Bean Chili in 5 Minutes

A few weeks ago I crock potted some pork. Froze a few small containers of it, and left some out for immediate use. 

Sunday, cooked up a pound and a half of black beans. Added pre-chopped onions, celery, and carrot from T-Jo.  A little garlic. Not a whole lot of other seasonings. Froze some, left some out.

And, there's almost always some cooked brown rice around here, either in the fridge or the freezer.

So, last night I finally got around to one of the combinations I'd intended when making the pork oh so many crock pot sessions ago: Pork and black bean chili.

Very easy:

  1. Grab a container of pork from the freezer and pop it in the fridge before you leave for work -- about a cup or so.
  2. Also grab a container of precooked black beans, preferably one in which you've put lots of the black bean juice.  Maybe 3 cups total. or 4?
  3. When you get home, dump the pork and black beans into a pan and shred the pork with a fork.
  4. Get it started heating while you finish adding stuff:
    • Pre-cooked brown rice - maybe a cup?
    • Some tomato paste - about 1/2 or 2/3 of a 6 ounce can.
    • Dehydrated garlic, chili powder, cayenne - to taste 
    • pre-chopped onions from T-Jo - probably 1/4 or 1/2 cup
    • A dash of salt
Boom. You're done. Chili in 5 minutes, and only one pan and a few freezer containers to wash.  It probably won't win any prizes in a chili cook off, but it is easy, healthy, and fast.


Wednesday, August 4, 2010

In Praise of Cuban Black Bean Dip

Last night I was experimenting with the concept of cooking ground meat for dinner.
My mom used to make elaborate stove top casseroles with ground beef. She also made an incredible hamburger soup. These things would take hours. And, they'd require chopping. I don't do chopping. Especially not on week nights.

So, I took the pound of ground sirloin out of the fridge, shaped it into 4 semi-rectangular patties, just right for cooking 2 at a time in the smaller of my two skillets. Put 'em on to cook. Started the vegs.
When the two burgers were done, I set 'em aside, then grabbed my leftover brown basmati rice and threw it in the skillet. Added a little water & covered it.
Now, what to do to make the rice less... boring?
I rummaged in the cupboard and found some Cuban black bean dip I'd picked up on impulse at Fresh and Easy a few months ago. Unlike most of the things in my cupboard, it wasn't so far past its use by date that I couldn't use it.

I checked the label: No verboten ingredients. Not organic, but at least no MSG, nitrates, nitrites, corn derivatives, wheat, or anything unpronounceable and unspellable. Mostly stuff you might put in your own Cuban black bean dip, if you were inclined to do that sort of thing.

When Spouse 1.0 opened the jar, it gave a satisfying pop. Not rotten. So far, so good.
I put a glop or two of it on the rice and smooshed it in, replaced the lid. An appetizing aroma wafted through the kitchen as it heated up.

Menu:
  • Sirloin burger, about 4 oz pre-cooked weight per person
  • 1/3 cup rice and black bean mixture for me, about 1 cup for Spouse
  • 1 large bowl full of vegies per person
Nutrition:
  • Probably about 300 or 350 calories for her, 500 to 600 for him

Results:
  • Heavenly! I'll definitely do this one again.